


I've had a couple friends recently ask me about gardening. I've only been at it for a couple years now, but I feel like I have a good enough handle on the basics to share what I know and show you my own progress.
Step 1: Know what you want to plant and when to plant it. There are so many resources available on Pinterest right now that perfectly demonstrate the timeline for most of your favorite vegetables.
 |
| via |
Tomatoes, summer squashes, beans and peppers are all warm season crops so they get started later in spring. Lettuces, winter squashes and veggies in the cabbage family are cool season crops so they can be planted in early spring and late summer. Because frost and winter temperatures will kill your babies, it's important that you start your seeds indoors until it warms up enough for them to survive outside on their own.
Step 2: Grab a container. You don't need fancy pottery or gardening do-hickeys to start your seeds- egg cartons, aluminum cans, plastic bottles and K-cups are all fantastic tools to birth your seeds! Since my Mom bought us a Keurig coffee machine for Christmas this year, I'll demonstrate with my K-cups. I removed the used K-cup label from the cup and threw it away. Using a knife, I removed the inner filter and coffee grounds from the cup and tossed most of them in the garbage (*If you're a coffee drinker, be sure to hang onto your coffee grounds-they're an amazing fertilizer so feel free to add a handful or two to your soil!). What ever container you decide to use, be sure to poke a hole in the bottom for drainage- otherwise you run the risk of drowning your plants!

Step 3: Get planting. Fill your container up 3/4 of the way with your soil. Using your finger gently press a small hole into the soil (about a 1/2 inch is sufficient). Add a couple drops of water to moisten it and add two of your seeds. By planting two you ensure that at least one will come up! Gently fill in the hole- don't compact your soil by pushing down on it, you want to give your plants an easy way to sprout.
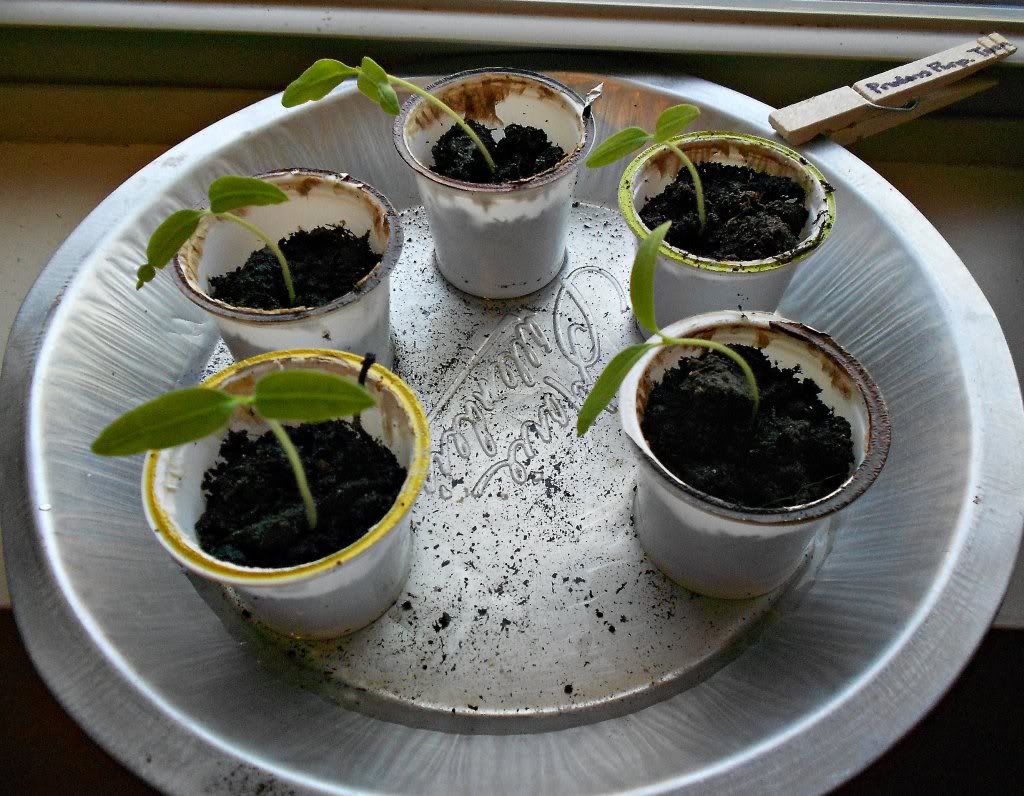
Step 4: Set up a good environment. Once all your seeds are planted, place them in a tray, pan or any large, flat container. You want something that will catch any water and run-off dirt, otherwise your house will be a mess! I used two pie tins and separated my K-cups between them so I wouldn't get my two types of tomatoes mixed up. I used a clothespin to label them and placed them on the windowsill.
Step 5: Nurture your babies. Be sure that your seeds get plenty of sunlight. When you notice the soil getting dry, you can pour water directly into your tray for the plants to absorb. The holes at the bottom allow them to suck up the water they want and no more than they need.
There you have it- easy as can be! Stay tuned for an update when it comes time to transplant!
Just planted my veggie garden last weekend, hoping it work:)
ReplyDeleteJessica
stayathomeista.com
Great tips! Black thumb here, so I love learning more about the basics like this!
ReplyDelete